Chocolate Mint Pudding- It’s Dairy Free!

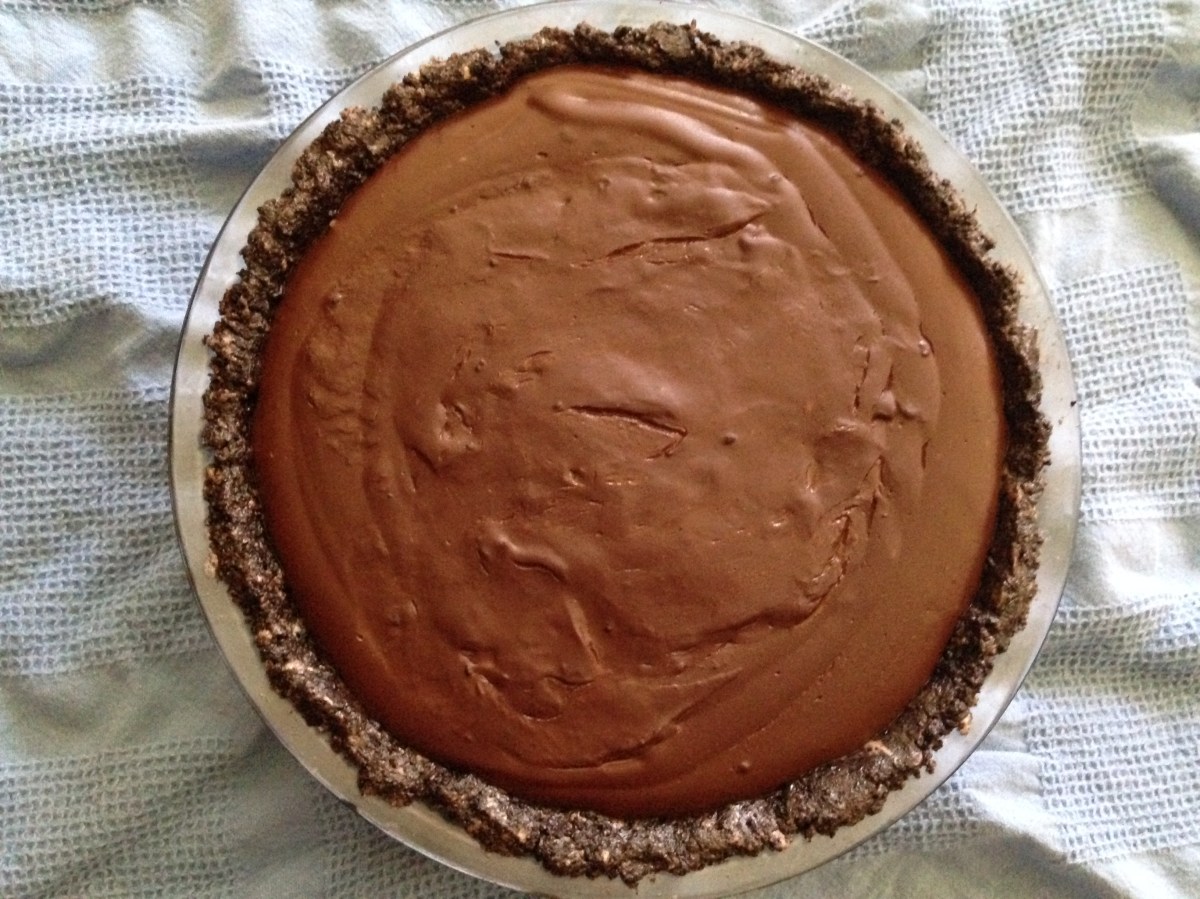
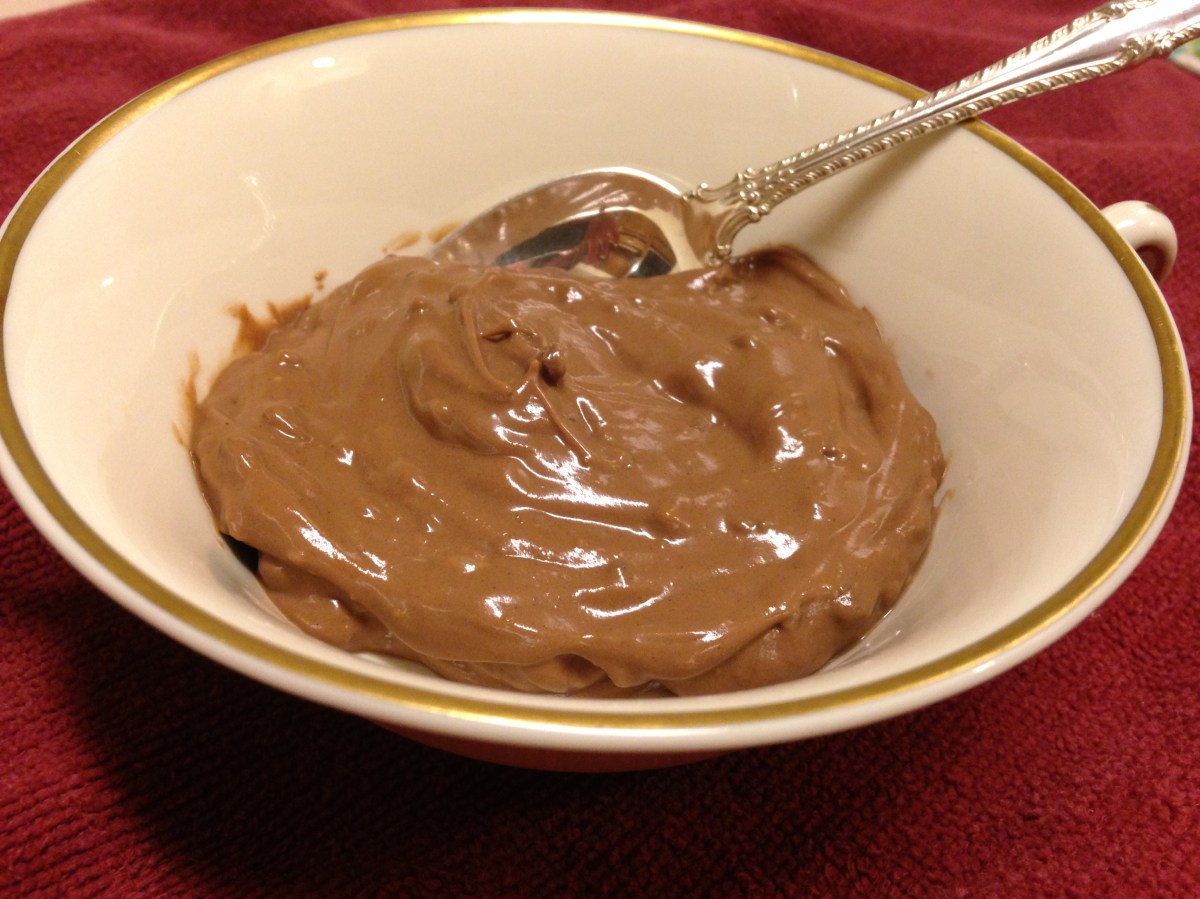
Have you ever tried to make a package of pudding with non-dairy milk?  The last time I tried it, it was a complete failure.  Dairy milk has magical qualities that occasionally can’t be replaced.  So, I decided to try my hand at dairy free pudding but I took a different approach.  Basically this is the filling to the chocolate cream pie I have posted here:https://oldfavoritesmadeglutenfree.com/2015/12/19/baked-chicken/.  The only difference is I used a less creamy can of coconut milk and I was out of baking chocolate so I used Enjoy Life Chocolate Chips.

The mint came from one of my cousin’s kids.  Apparently he grows his own mint and dries it on the horns of deer they have hanging around their house.  How cool is that! (For all of you who are concerned, don’t worry.  They use the deer for meat, not just for sport.)


Ingredients:

1/4 c. cornstarch

1/4 c. granulated sugar

3 T. cocoa powder

1/4 tsp salt

1 can coconut milk (14 oz- a lower fat percentage is fine)

1 1/4 c. coconut milk (from a carton)

1 T. dried mint

1/2 c. Enjoy Life Mini Chocolate Chips* or 4 oz. Baker’s brand baking chocolate

1 tsp vanilla


Directions:

In a mug or glass measuring cup, heat the 1 1/4 c. coconut milk.  Put the mint leaves into a bag or a steeping spoon and allow to steep in the milk for 5-7 minutes. When it smells like mint, remove the mint.

In a sauce pan, combine cornstarch, sugar, cocoa powder, and salt.  Stir in canned coconut milk and coconut milk steeped with mint and turn on heat to medium heat.  Whisk continually until boiling.  Boil for two minutes.  Remove from heat and add chocolate chips and vanilla.  Stir until melted and smooth.  Cool and then store in the refrigerator.  When serving, garnish with a fresh mint leaf if you have one.


*I would recommend microwaving these in a bowl for about 10-15 second intervals until they are a bit softened.  Then they will melt better when added to the pudding.

Favorite Pancakes

This is another one of my favorite recipes.  This time I actually wrote down exactly what I did with the flours!  Normally I just set out the cup and start filling it with a mix of flours that I have on hand.   Top these with real maple syrup and some dairy free butter.  Yum!


Ingredients:

Dry ingredients:

2 1/2 c. flour (1 c. brown rice flour, 1/2 c. oat flour, 1/4 c. amaranth, 1/4 c. potato starch, 1/4 c. teff, 1/4 c. tapioca starch, 1/2 tsp xanthan gum)

2 T. baking powder

2 T. sugar

1 tsp salt

Wet ingredients:

2 flax eggs (2 T. golden flaxseed meal combined with 6 T. warm water- let rest for 5 minutes) (or you can use 2 real eggs if you don’t need to be egg free)

2 c. coconut milk (from the carton- I usually use Silk)

1/4 c. oil


Directions:

Make the flax eggs and set aside.  Stir together the dry ingredients.  Pour wet ingredients into the dry ingredients and stir together until blended.  Mix with a mixer for about 15-30 seconds to get out any lumps.

Heat griddle until a drop of water sizzles on it.  Add batter by about 1/4 to 1/3 c. at a time depending on what size you like your pancakes.  Flip when the edges are looking firm and it is easy to get a spatula under it.  Cook until that side it done.  Serve with vegan butter and real maple syrup.

Makes about a dozen.


*This recipe is flexible, so you can change up the flour blend if you would like- just make sure to put in some xanthan gum!  As a kid, my mom usually replaced a little bit of all-purpose flour with whole wheat flour, so I usually am trying to imitate that flavor.  Many of the blends in the store are imitating straight up white all-purpose flour.  If that’s the taste you like, a blend from the store may be the perfect thing for you.


IMG_4889.JPG
Mmmm….yummy!

Chocolate Glaze

There’s nothing like a chocolate donut.  The glaze just puts it over the top.  This glaze spreads on easily but then hardens up nicely just like it should- not hard like a chocolate chip, but not gooey.  I had to give some away and stick some in the freezer to keep myself from eating too many at once.  As one of the kid recipients said, “It tastes like a cupcake!”  Indeed, it does.  This recipe makes enough for about 9 donuts, so double it if you are pairing it with my chocolate donut recipe which makes 18.   Find the recipe here: Chocolate Donuts.

Ingredients:

IMG_4918


Glaze for 9 donuts:

Ingredients:

3/4 c. powdered sugar

1/4 c. cocoa powder

1/4 tsp vanilla

1 1/2 to 2 T. coconut milk

dash salt (about 1/8 tsp)


Combine sugar and cocoa powder.  Add in vanilla and 1 1/2 T. coconut milk.  Stir until a paste begins to form.  Add the extra 1/2 T. of milk if it is too dry to be spreadable.  Add the dash of salt and combine well.  Taste and see if you want more salt.  Spread on tops of cooled donuts.


Doubled for 18 donuts:

1 1/2 c. powdered sugar

1/2 c. cocoa powder

1/2 tsp vanilla

3-4 T. coconut milk

1/8 to 1/4 tsp salt, according to taste


Bubble Bread

This is an old family favorite and one of the first recipes I started working on to make gluten free.  It is similar to monkey bread but requires no yeast, so it is much quicker.  I’ve made a few of the original steps easier than the original recipe.  Also, I have tried this with a variety of flour blends and they have all worked.  This time I happened to use a pre-made blend, but normally I blend my own flours.  See notes below for suggestions.


Ingredients:

1/2 c. butter (Smart Balance non-dairy)

2- 8×8 pans or something of similar sizes

Dry:

4 cups flour (I used Arrowhead Mills’ Heritage Blend this time, but I have also made it with a mixture of other flours.  See note below for other options.*)

1/2 tsp xanthan gum (if your flour blend doesn’t already contain some)

2 T. baking powder

2 tsp salt

1/2 c. sugar

1/2 tsp cinnamon

Wet:

1/2 c. canola oil (or vegetable oil)

1 1/2 c. coconut milk (from a carton)


Topping:

additional 1/2 c. sugar

additional 1/2 tsp cinnamon


Directions:

Melt 1/2 c. butter and use a little bit to grease both 8×8 pans.  Stir together dry ingredients in a bowl.  Add the oil and coconut milk and stir well.  I usually whisk it briefly with a mixer just until combined.

In a separate bowl, mix together the additional sugar and cinnamon.

Pinch dough into about 1 T size balls and put in pans until all the dough is used.  Most of them will be touching and that is fine.  Spoon the butter over the balls in the pans and make sure to get a little butter on each ball.  Sprinkle the cinnamon and sugar mixture evenly over all the balls and make sure to get the edges too.

Bake at 450 degrees for 15 minutes or until tops start to brown just slightly and dough springs back to the touch.

*  This recipe is very flexible.  The most important thing with any blend is to make sure you have a touch of xanthan gum in there- at least 1/4 to 1/2 tsp.  That will replace the stickiness of gluten and help hold it together.

*I usually just mix and match whatever flours I have around to make this.  Next time I make this I will try to write down exactly what I do.  Here is an approximation of what I have done in the past: 1 1/2 c. brown rice flour, 1/2 c. oat flour, 1/2 c. amaranth, 1/2 c. potato starch, 1/2 c. tapioca starch, 1/2 c. teff, 1/2 tsp xanthan gum.  Adding in some teff flour gives it a whole wheat flair which I really love.  If you don’t have amaranth, you can just replace it with brown rice flour.  The potato starch and tapioca starches help add some lightness to the flour so it is not as dense.

Chocolate Truffles

I am seeing a theme in my posts.  Apparently I make a lot of chocolate things.  I was flipping through an appliance cookbook and realized very little had to be changed in this recipe.  Watch out!  They are very rich, so I suggest making them with the intention of sharing with others :-).


Ingredients:

8 oz. cream cheese (I used Tofutti but Daiya has a great taste too.)

1/4 c. Smart Balance butter, room temperature

1 tsp vanilla

2/3 tsp salt

2/3 c. cocoa powder

3 1/2 c. powdered sugar

1/2 c. chopped walnuts or pecans (We liked pecans the best.)


I used a stand mixer for this whole process, but you could probably do it with a hand mixer.

Directions:

Cream together the cream cheese and butter.  Add the vanilla, salt, and cocoa and continue whipping.  Add the powdered sugar one cup at a time and continue to whip it until it is creamy and combined.  Use a spoon to help you scoop about 1 T. together into a ball.  You can just put them in clumps and shape them after they are cooled.

Freeze for one hour and then reshape as needed.  Roll in chopped nuts.

I left some without nuts and they still tasted good.  I think they would also be delicious if dipped in baking chocolate, but I didn’t try it this time.


Recipe adapted from Hamilton Beach Recipes and User Guide p. 26.

I know, right?  Weird source.  By the way, if you are in need of a stand mixer, I have found that my Hamilton Beach one works well so far.

Gluten Free Vegan Waffles

These were a hit on Christmas morning.  If you are new to gluten free, make sure you clean your waffle maker really well if it was used for not gluten free waffles in the past.  I received my waffle iron as a gift after I went gluten free, so it was a non issue for me.  I don’t like it spilling over the edges, so I usually have slightly incomplete looking waffles as shown in the picture.  You can avoid that fate by filling yours up more.  We were ready to eat so I just snapped a quick picture.


Ingredients:

2 1/4 c. flour (This is my normal recipe but flours can be substituted: 1 c. brown rice flour, 1/2 c. oat flour, 1/4 c. tapioca starch, 1/4 c. potato starch, 1/8 c. millet flour, 1/8 c. teff)

1/2 tsp xanthan gum

4 tsp baking powder

3/4 tsp salt

1 1/2 T. sugar

2 flaxseed eggs (2 T. ground golden flaxseed combined with 6 T. water- let sit for 5-10 minutes)

2 1/4 c. coconut milk (from a carton)

1/2 c. oil- I used canola


Make the flax eggs and set aside.  Combine dry ingredients.  Mix wet ingredients (including flax eggs) and stir into dry ingredients.  Use a mixer to make sure all lumps are gone.  Cook using a waffle iron- follow directions for your waffle iron.  For mine, I let it preheat and then I cook the batter for 5-6 minutes until it starts to brown.  They should taste light and kind of crispy.


I served it with Smart Balance butter and real maple syrup.


Adapted from “Oh Boy” Waffle recipe.  I have no idea where we originally found that recipe because I’ve worked off of a notecard for so long.


Peppermint Hot Chocolate

My husband and I hosted Christmas at our house for the first time this year.  I felt so grown up :-).  I also felt quite in the mood for Christmas-y things and was looking for a way to use some of the peppermint pieces leftover from peppermint ice cream.  My sister and I made this hot chocolate and thought I’d share!

Ingredients:

1 mugful of coconut milk (from a carton- I prefer the original flavor)

3 T. Ghiradelli Double Chocolate hot chocolate mix (may contain traces of allergens if that concerns you)

1-2 T. peppermint stick, crushed (sold pre-crushed in a bag in the baking aisle)

1-2 T. SoDelicious whipped topping or your own homemade topping


Directions:  Microwave the coconut milk in the mug until hot (2-4 minutes depending on your microwave).

Stir in the hot chocolate mix.

Stir in 1+ T. peppermint sticks crumbles to taste.

Top with whipped topping and a few more crumbles of peppermint stick.

Enjoy!


This recipe works just as well with regular milk and regular whipped topping, so use what you need.

Chocolate Cream Pie

I served this pie at Thanksgiving and Christmas and it was a hit!  It sets up very nicely in the fridge overnight.  Hope you enjoy this as much as we did! For best results, keep it refrigerated until ready to serve.


Chocolate Cream Pie

Crust: 1 package Glutino chocolate cream cookies (may contain traces of egg), crushed

1/4-1/2 c. Smart Balance butter (use enough to make the cookie crumbs stick together)

Puree the cookies in a blender until they are crumbs.  Melt the butter and mix in the crumbs until they are just wet enough to stick together.  Press the crumb mixture into a pie shell.  Put the crust in the freezer for 20 minutes while you are making the filling.


Filling:

1/4 cup cornstarch

1/4 c. granulated sugar

3 T. cocoa powder

1/4 tsp salt

1 and 1/4 cup coconut milk (from a carton- I usually use Silk or So Delicious)

1 can of coconut milk (I used a 14-oz can of coconut cream- the kind with no sugar or anything added.  The extra creaminess helps the pie set up well.)

4 oz. dark chocolate, chopped (I use Baker’s brand semi-sweet baking chocolate.  I microwave it on a plate just until it is slightly softened but not melting.  Then it is easier to chop on a plate.  Read the label closely if you are allergic as it may contain traces of some things.)

1 tsp vanilla


Directions:  In a saucepan, combine cornstarch, sugar, cocoa powder and salt.  Stir well.  Add in both kinds of coconut milk and use a whisk to combine.  Turn on the stove to medium high and stir constantly until the mixture starts to boil.  Stir for two more minutes as it thickens and then remove from heat.  Stir in the chopped chocolate and vanilla until all the chocolate is melted.  Pour into frozen crust and let cool.  After it is cooled, put it in the fridge overnight so it will set up.


May be served with whipped topping.  So Delicious just came out with a coconut whipped topping and it is wonderful!  Make sure to read the directions- I didn’t thaw it out soon enough for the pumpkin pie…


Original recipe: http://hellyeahitsvegan.com/chocolate-cream-pie/

Chocolate Bundt Cake

Last night we celebrated some family birthdays with this cake.  It was a hit!  The trick to getting it out of the bundt pan is to grease and flour the pan.  Of course, if you’re going for gluten free, make sure you flour it with gluten free flour.  I usually use white rice flour.  The white you see on the top of the cake is the flour.  It was later covered by frosting and you couldn’t tell, so don’t worry :-).


1/2 c. coconut oil

1 1/2 c. granulated sugar

3 Ener-G eggs (4 1/2 tsp Ener-G egg replacer and 6 T water)

2 tsp vanilla

1 c. brown rice flour

3/4 c. potato starch

1/2 c. tapioca starch

1/2 tsp xanthan gum

1 tsp baking powder

1 tsp baking soda

1/2 tsp salt

1/2 c. cocoa powder

1 c. coconut milk (from a carton)

1/2 c. chocolate chips (I use Enjoy Life dark chocolate morsels)

Directions:

Melt coconut oil and stir together with sugar in a large bowl.  Add “eggs” and vanilla and stir well.

In a separate bowl, combine dry ingredients.

Add the dry ingredients and the milk to the wet ingredients, beginning and ending with the dry ingredients.  I usually give it a quick mix with a mixer just to make sure all those gluten free ingredients are incorporated (about 1-2 minutes).  The last thing you want is a mouthful of unblended rice flour.   Stir in chocolate chips.

Pour batter into greased 8×8 pan or round cake pan (or you could do cupcakes and just reduce the baking time).  Bake in preheated oven at 350 degrees for about 30-40 minutes until cake springs back when you touch it.

You may top with frosting.  I don’t have a quantified recipe yet, but I’ll try to write down what I do sometime and post some frosting recipes.  Until then, just so you know, I usually use powdered sugar, Smart Balance or Earth Balance butter, coconut milk, salt, and vanilla to make frosting.

Also, if you read my donut post, you will notice that this recipe is almost identical to the donut recipe with the exception of the additional chocolate chips and the pan it is cooked in.  I have a theory that if you find donuts to be an acceptable breakfast, then you should have no problem with a piece of cake for breakfast.  Happy eating :-).

Adapted from http://glutenfreehomemaker.com/gluten-free-yellow-cake-recipe/

Chocolate Donuts

Chocolate donuts.  Is it possible?  Yes, it is!  I have decided that cake donuts are just that- cake in a donut shape.  So, here is a recipe for making chocolate donuts.  Or, if you prefer cake, put it in a cake pan.


1/2 c. coconut oil

1 1/2 c. granulated sugar

3 flax eggs (3 T. golden flaxseed meal and 9 T. warm water) OR 3 Ener-G eggs (4 1/2 tsp Ener-G egg replacer and 6 T water)

2 tsp vanilla

1 c. brown rice flour

3/4 c. potato starch

1/2 c. tapioca starch

1/2 tsp xanthan gum

1 tsp baking powder

1 tsp baking soda

1/2 tsp salt

1/2 c. cocoa powder

1 c. coconut milk (from a carton)


Directions:

Melt coconut oil and stir together with sugar in a large bowl.  Add “eggs” and vanilla and stir well.

In a separate bowl, combine dry ingredients.

Add the dry ingredients and the milk to the wet ingredients, beginning and ending with the dry ingredients.  I usually give it a quick mix with a mixer just to make sure all those gluten free ingredients are incorporated (about 1-2 minutes).  The last thing you want is a mouthful of unblended rice flour.

Put about 2 1/2 T. of batter into greased donut pan.  Bake in preheated oven at 350 degrees for about 13-15 minutes until donut springs back when you touch it.

Makes about 18.

You may top with glaze.  See the recipe here: Chocolate Glaze.


Adapted from http://glutenfreehomemaker.com/gluten-free-yellow-cake-recipe/