Focaccia Bread

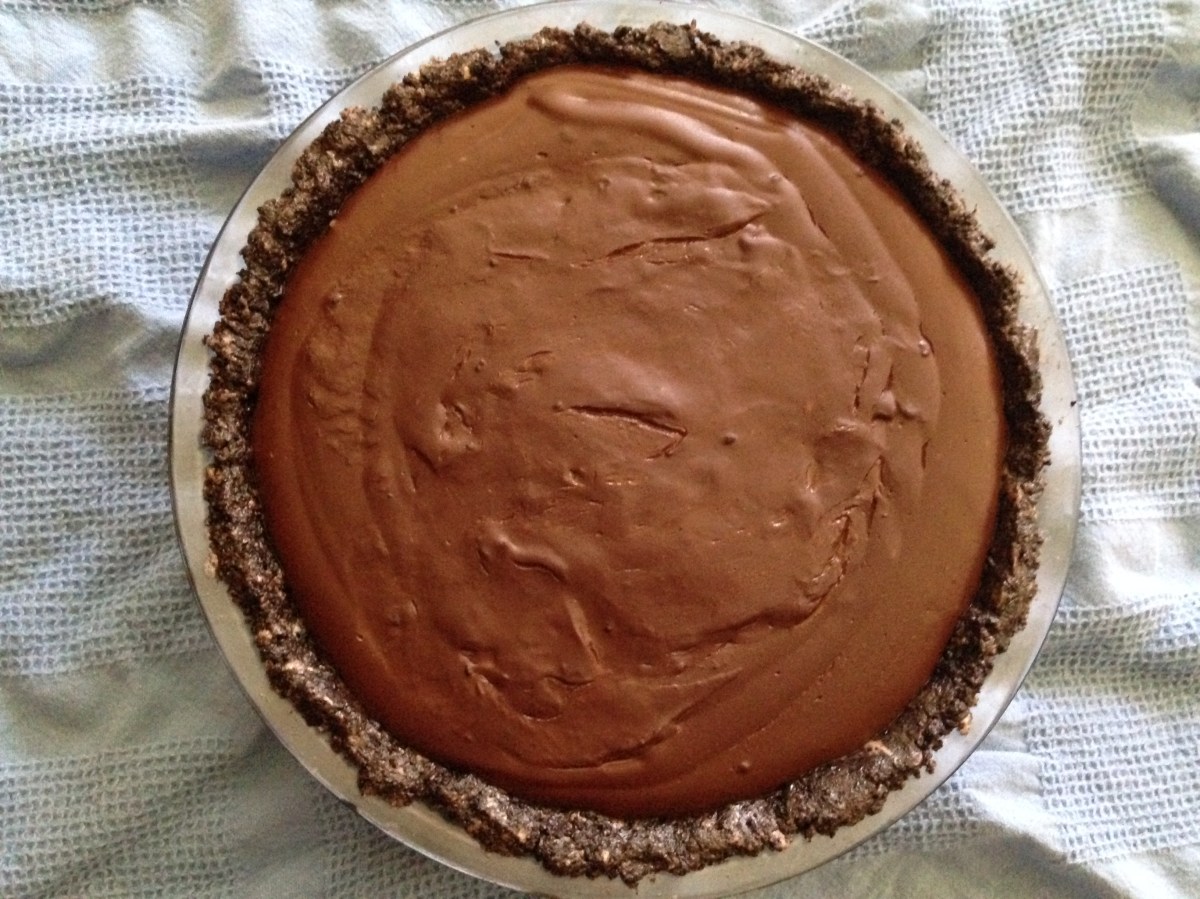
I made this the other day with a friend.  This picture was taken while it was still bubbling.  When I took it out of the oven I thought it was a failed recipe and my friend said, “It looks like fried bread.”  After about 20 minutes it soaked up the oil and was perfect!  With that said, make this and then let it rest before trying to wrest it out of the pan.  If you wait it won’t be hard :-).  Use fresh herbs if you can but dried herbs will work too.  I may or may not have eaten about half the pan the first day…

Ingredients:

Oil mixture:

1/2 c. olive oil

2 cloves garlic, minced

1 T. fresh thyme, chopped (or 1 tsp dried thyme)

1 T. fresh rosemary, chopped (or 1 tsp dried)

1 T. fresh oregano, chopped (or 1 tsp dried)

1 T. fresh basil, chopped (or 1 tsp dried)

1/4 tsp black pepper

Flour mixture:

1 c. warm water (about 110 degrees- I use a candy thermometer)

2 1/4 tsp active dry yeast (1 envelope)

1/4 tsp honey (or use sugar if you want it to be truly vegan)

2 1/2 c. flour (I used Bob’s Red Mill 1-to-1 baking flour- it already has xanthan gum in it)

1 tsp salt


Directions:

Combine olive oil, garlic, herbs, and black pepper in a small saucepan without the heat on.  After it’s combined, turn the heat on to low and stir occasionally for 5 to 10 minutes.  The herbs should start smelling good but the garlic should not brown.  Take off the heat and set aside.

In a large mixing bowl (use your stand mixer bowl if you have one), stir together the warm water, honey, and yeast.  Allow it to sit for 5 minutes.  Add 1 c. of the flour blend and 1/4 c. of oil mixture.  Stir just until flour is moistened.  Allow it to sit for another 5 minutes.  Add the remaining flour mixture and the salt.  Don’t forget the salt!  Stir until blended.  Stir on low speed using a stand mixer for about 1 minute (the equivalent of being kneaded 10-15 times, but I wouldn’t try kneading with gluten free dough-it’s just too sticky.)

Oil another large bowl and move the batter into that bowl.  Cover it with a towel and set in a warm, undisturbed area for 1 hour.

When dough is almost finished rising, preheat the oven to 450 degrees (230 degrees Celsius).  Use 2 T. of the oil mixture to grease a 9×13 inch pan (I used a Pyrex dish).

Press the dough into the baking pan with your fingers making sure to leave dimples in the top (this should happen naturally as long as you don’t smooth it out with a spatula).  Drizzle the top with the remaining oil mixture.  Let dough rise for another 20 minutes.  Bake at 450 degrees for 15-20 minutes or until golden brown.  Allow it to cool in the pan.*

*When it came out, mine looked like it was sitting in a bunch of oil and I thought it had failed.  As the bread started to cool, it soaked the oil back up which is what it was supposed to do.  Leave it in the pan until it cools.  After it soaks the oil up, I would suggest loosening the bread from the pan with a spatula but leaving the bread in the pan.  This should help prevent it sticking to the pan when it cools.  This could also work as a pizza crust.


Adapted from: http://www.inspiredtaste.net/19313/easy-focaccia-bread-recipe-with-herbs/


Beef and Bean Enchiladas

This is the last lonely enchilada.  I made several pans of them and remembered to take a picture right before I ate the last one!  I served these enchiladas to my family on Christmas Eve.  I did most of the prep ahead of time and just rolled them while the oven was heating up.  The beans make them creamy so you don’t really notice the absence of cheese.  However, if people want cheese but not everyone can have it, I suggest putting some shredded cheese on the table that they can add at their leisure.


Ingredients:

1 pound ground beef (omit if vegetarian)

1-2 cups cooked and mashed pinto or white beans or 1-2 cans of refried beans

several dashes of salt if you make your own beans

juice of 1 lime

1 can rotel

2 cans of mild Old El Paso Enchilada Sauce (last time I checked it was gluten free.  Please always take personal responsibility and check the ingredients.  Sometimes manufacturers change things without much of an announcement.)

1 package of corn tortillas


Directions for beans: If you are making your own beans, soak them overnight, drain in the morning, and put them in a crockpot all day on low.  They are finished when they are easily squishable.  I drained the liquid into a bowl and then added just enough in to be able to mash them with my immersion blender.  Make sure to add some salt if you made your own beans.  If that sounds too complicated, just get a can or two of refried beans. 🙂

Directions: Brown the ground beef until thoroughly cooked.  Add in the lime, rotel, and one can of enchilada sauce.

Lightly oil a 9×13 baking dish.  Open the second can of enchilada sauce and put a very thin layer on the bottom of the pan, but reserve most of it.  Grab a tortilla and put a spoonful of the beef and bean mixtures into the tortilla.  Roll it and place it in the pan.  Continue until the pan is full and/or all ingredients are used.  Top with remaining enchilada sauce.

Bake at 375 degrees for 20 minutes.

Serve with rice and guacamole if desired.

Bubble Bread

This is an old family favorite and one of the first recipes I started working on to make gluten free.  It is similar to monkey bread but requires no yeast, so it is much quicker.  I’ve made a few of the original steps easier than the original recipe.  Also, I have tried this with a variety of flour blends and they have all worked.  This time I happened to use a pre-made blend, but normally I blend my own flours.  See notes below for suggestions.


Ingredients:

1/2 c. butter (Smart Balance non-dairy)

2- 8×8 pans or something of similar sizes

Dry:

4 cups flour (I used Arrowhead Mills’ Heritage Blend this time, but I have also made it with a mixture of other flours.  See note below for other options.*)

1/2 tsp xanthan gum (if your flour blend doesn’t already contain some)

2 T. baking powder

2 tsp salt

1/2 c. sugar

1/2 tsp cinnamon

Wet:

1/2 c. canola oil (or vegetable oil)

1 1/2 c. coconut milk (from a carton)


Topping:

additional 1/2 c. sugar

additional 1/2 tsp cinnamon


Directions:

Melt 1/2 c. butter and use a little bit to grease both 8×8 pans.  Stir together dry ingredients in a bowl.  Add the oil and coconut milk and stir well.  I usually whisk it briefly with a mixer just until combined.

In a separate bowl, mix together the additional sugar and cinnamon.

Pinch dough into about 1 T size balls and put in pans until all the dough is used.  Most of them will be touching and that is fine.  Spoon the butter over the balls in the pans and make sure to get a little butter on each ball.  Sprinkle the cinnamon and sugar mixture evenly over all the balls and make sure to get the edges too.

Bake at 450 degrees for 15 minutes or until tops start to brown just slightly and dough springs back to the touch.

*  This recipe is very flexible.  The most important thing with any blend is to make sure you have a touch of xanthan gum in there- at least 1/4 to 1/2 tsp.  That will replace the stickiness of gluten and help hold it together.

*I usually just mix and match whatever flours I have around to make this.  Next time I make this I will try to write down exactly what I do.  Here is an approximation of what I have done in the past: 1 1/2 c. brown rice flour, 1/2 c. oat flour, 1/2 c. amaranth, 1/2 c. potato starch, 1/2 c. tapioca starch, 1/2 c. teff, 1/2 tsp xanthan gum.  Adding in some teff flour gives it a whole wheat flair which I really love.  If you don’t have amaranth, you can just replace it with brown rice flour.  The potato starch and tapioca starches help add some lightness to the flour so it is not as dense.

Chocolate Truffles

I am seeing a theme in my posts.  Apparently I make a lot of chocolate things.  I was flipping through an appliance cookbook and realized very little had to be changed in this recipe.  Watch out!  They are very rich, so I suggest making them with the intention of sharing with others :-).


Ingredients:

8 oz. cream cheese (I used Tofutti but Daiya has a great taste too.)

1/4 c. Smart Balance butter, room temperature

1 tsp vanilla

2/3 tsp salt

2/3 c. cocoa powder

3 1/2 c. powdered sugar

1/2 c. chopped walnuts or pecans (We liked pecans the best.)


I used a stand mixer for this whole process, but you could probably do it with a hand mixer.

Directions:

Cream together the cream cheese and butter.  Add the vanilla, salt, and cocoa and continue whipping.  Add the powdered sugar one cup at a time and continue to whip it until it is creamy and combined.  Use a spoon to help you scoop about 1 T. together into a ball.  You can just put them in clumps and shape them after they are cooled.

Freeze for one hour and then reshape as needed.  Roll in chopped nuts.

I left some without nuts and they still tasted good.  I think they would also be delicious if dipped in baking chocolate, but I didn’t try it this time.


Recipe adapted from Hamilton Beach Recipes and User Guide p. 26.

I know, right?  Weird source.  By the way, if you are in need of a stand mixer, I have found that my Hamilton Beach one works well so far.

Stuffed Acorn Squash

This is one of my favorite fall recipes.  It looks beautiful and appears to be labor intensive, but it isn’t.  When it’s all said and done, it takes about an hour from beginning of prep to the time it arrives on the table.  The original recipe is from a newspaper clipping.  I have made a few changes, but it is still delicious!


Ingredients:

2 medium acorn squash

1 pound ground beef or deer

1 medium onion, chopped

1 tart apple, chopped (I use Granny Smith)

1 glove garlic, minced

2 T. brown rice flour

3 T. gluten free soy sauce (I use Kikkoman’s- just make sure it says gluten free on it)

salt to taste

3 T. dry red wine (I used merlot)

optional if not dairy free: 1/2 c. shredded cheese (cheddar, mozzarella, or Parmesan)


Directions:

Cut squash in half from stem to tip and throw away seeds.  Fill baking dish to 1/2 inch depth with hot water (I just microwave the water).  Place squash, cut side down, in a baking dish.  Bake uncovered for 30 minutes at 400 degrees.

While the squash is cooking, brown the ground beef with the chopped onion, apple, and garlic until meat is cooked.  Sprinkle in flour and stir well. Add soy sauce and wine and stir.  Bring mixture to a boil and stir until it thickens.  Remove from heat.

Remove squash pan from oven and carefully turn each half over (leave the water in the pan) and fill each half with the meat concoction.  I press it down into the squash halves to try to make it all fit :-).  Cook the filled squash in the pan with the water still in the pan for another 15 minutes until meat begins to brown on top slightly.  If you are not dairy free, you may top with cheese and return to the oven for another 5 minutes.

To serve, remove the squash from the pan and place on a plate.  To eat, scoop out one bite at a time, no knife needed.  I usually serve this by itself- it has veggies and meat included and is way more filling than you’d think.


Original recipe from “Harvest Stuffed Squash” The Eagle [Bryan], 13 September 2009. Taste of Home Cooking School p. 22.

Chocolate Cream Pie

I served this pie at Thanksgiving and Christmas and it was a hit!  It sets up very nicely in the fridge overnight.  Hope you enjoy this as much as we did! For best results, keep it refrigerated until ready to serve.


Chocolate Cream Pie

Crust: 1 package Glutino chocolate cream cookies (may contain traces of egg), crushed

1/4-1/2 c. Smart Balance butter (use enough to make the cookie crumbs stick together)

Puree the cookies in a blender until they are crumbs.  Melt the butter and mix in the crumbs until they are just wet enough to stick together.  Press the crumb mixture into a pie shell.  Put the crust in the freezer for 20 minutes while you are making the filling.


Filling:

1/4 cup cornstarch

1/4 c. granulated sugar

3 T. cocoa powder

1/4 tsp salt

1 and 1/4 cup coconut milk (from a carton- I usually use Silk or So Delicious)

1 can of coconut milk (I used a 14-oz can of coconut cream- the kind with no sugar or anything added.  The extra creaminess helps the pie set up well.)

4 oz. dark chocolate, chopped (I use Baker’s brand semi-sweet baking chocolate.  I microwave it on a plate just until it is slightly softened but not melting.  Then it is easier to chop on a plate.  Read the label closely if you are allergic as it may contain traces of some things.)

1 tsp vanilla


Directions:  In a saucepan, combine cornstarch, sugar, cocoa powder and salt.  Stir well.  Add in both kinds of coconut milk and use a whisk to combine.  Turn on the stove to medium high and stir constantly until the mixture starts to boil.  Stir for two more minutes as it thickens and then remove from heat.  Stir in the chopped chocolate and vanilla until all the chocolate is melted.  Pour into frozen crust and let cool.  After it is cooled, put it in the fridge overnight so it will set up.


May be served with whipped topping.  So Delicious just came out with a coconut whipped topping and it is wonderful!  Make sure to read the directions- I didn’t thaw it out soon enough for the pumpkin pie…


Original recipe: http://hellyeahitsvegan.com/chocolate-cream-pie/

Mango Chicken

The idea for this recipe came from some cookbook long, long ago.  I have changed it so much and made it my own, and I don’t remember where the original source was.  I made it several times using fresh mangos when I was in Central America.  The best I can do now is frozen mangos, but they taste good too.  My husband and I really enjoyed this and we hope you do too!

Mango Chicken

1 large onion, chopped

1 bag of frozen mangos, cut into smaller pieces (you can use fresh if you can find good ones, but the frozen ones worked great!)

2 pounds chicken tenderloins, precooked (I have a method for pre-cooking chicken which I will share in another post.)

2 T melted butter (I used Smart Balance dairy free)

1 tsp salt or more, to taste

1/2 tsp ground black pepper or more, to taste

1/4 tsp paprika

pinch of nutmeg

Grated rind of one lemon (optional)

1 cup chicken broth (make sure it’s gluten free- I use Swanson’s or HEB brand usually)

juice of 1 lemon

1 can coconut milk, 14 oz.  (use full fat, not the lite ones)


Chicken mixture:

Place onions in a large skillet and cook to soften.

Combine “butter”, salt, pepper, paprika, and nutmeg in a small bowl.  Rub all over chicken.

Put chicken and mango in the pan with the onions and cook until warm throughout.


Meanwhile, make the milk sauce:

Bring chicken broth to a boil in a saucepan.  Reduce the heat and stir in lemon juice and coconut milk.  Continue to simmer and stir until it thickens just a little.

Pour the milk sauce into the chicken mixture and cook for 5-10 minutes to let the liquid reduce a little.  May be served over rice.

IMG_4647
This is what it looked like in the pan before I served it over rice.

We hope you enjoy this as much as we did!

Chocolate Bundt Cake

Last night we celebrated some family birthdays with this cake.  It was a hit!  The trick to getting it out of the bundt pan is to grease and flour the pan.  Of course, if you’re going for gluten free, make sure you flour it with gluten free flour.  I usually use white rice flour.  The white you see on the top of the cake is the flour.  It was later covered by frosting and you couldn’t tell, so don’t worry :-).


1/2 c. coconut oil

1 1/2 c. granulated sugar

3 Ener-G eggs (4 1/2 tsp Ener-G egg replacer and 6 T water)

2 tsp vanilla

1 c. brown rice flour

3/4 c. potato starch

1/2 c. tapioca starch

1/2 tsp xanthan gum

1 tsp baking powder

1 tsp baking soda

1/2 tsp salt

1/2 c. cocoa powder

1 c. coconut milk (from a carton)

1/2 c. chocolate chips (I use Enjoy Life dark chocolate morsels)

Directions:

Melt coconut oil and stir together with sugar in a large bowl.  Add “eggs” and vanilla and stir well.

In a separate bowl, combine dry ingredients.

Add the dry ingredients and the milk to the wet ingredients, beginning and ending with the dry ingredients.  I usually give it a quick mix with a mixer just to make sure all those gluten free ingredients are incorporated (about 1-2 minutes).  The last thing you want is a mouthful of unblended rice flour.   Stir in chocolate chips.

Pour batter into greased 8×8 pan or round cake pan (or you could do cupcakes and just reduce the baking time).  Bake in preheated oven at 350 degrees for about 30-40 minutes until cake springs back when you touch it.

You may top with frosting.  I don’t have a quantified recipe yet, but I’ll try to write down what I do sometime and post some frosting recipes.  Until then, just so you know, I usually use powdered sugar, Smart Balance or Earth Balance butter, coconut milk, salt, and vanilla to make frosting.

Also, if you read my donut post, you will notice that this recipe is almost identical to the donut recipe with the exception of the additional chocolate chips and the pan it is cooked in.  I have a theory that if you find donuts to be an acceptable breakfast, then you should have no problem with a piece of cake for breakfast.  Happy eating :-).

Adapted from http://glutenfreehomemaker.com/gluten-free-yellow-cake-recipe/

Chocolate Donuts

Chocolate donuts.  Is it possible?  Yes, it is!  I have decided that cake donuts are just that- cake in a donut shape.  So, here is a recipe for making chocolate donuts.  Or, if you prefer cake, put it in a cake pan.


1/2 c. coconut oil

1 1/2 c. granulated sugar

3 flax eggs (3 T. golden flaxseed meal and 9 T. warm water) OR 3 Ener-G eggs (4 1/2 tsp Ener-G egg replacer and 6 T water)

2 tsp vanilla

1 c. brown rice flour

3/4 c. potato starch

1/2 c. tapioca starch

1/2 tsp xanthan gum

1 tsp baking powder

1 tsp baking soda

1/2 tsp salt

1/2 c. cocoa powder

1 c. coconut milk (from a carton)


Directions:

Melt coconut oil and stir together with sugar in a large bowl.  Add “eggs” and vanilla and stir well.

In a separate bowl, combine dry ingredients.

Add the dry ingredients and the milk to the wet ingredients, beginning and ending with the dry ingredients.  I usually give it a quick mix with a mixer just to make sure all those gluten free ingredients are incorporated (about 1-2 minutes).  The last thing you want is a mouthful of unblended rice flour.

Put about 2 1/2 T. of batter into greased donut pan.  Bake in preheated oven at 350 degrees for about 13-15 minutes until donut springs back when you touch it.

Makes about 18.

You may top with glaze.  See the recipe here: Chocolate Glaze.


Adapted from http://glutenfreehomemaker.com/gluten-free-yellow-cake-recipe/

Glutino Stuffed Chocolate Chip Cookies


A.k.a. Oreo Stuffed Chocolate Chip Cookies but without gluten, dairy, or eggs

I first ran across this recipe a few months before I went gluten free.  It was a hit and I was sad when I found out I needed to go gluten free.  To me, that meant I would never eat these delicious cookies again.  However, I finally found some chocolate sandwich cookies that tasted pretty close and decided to try my hand at the recipe again.  This is the result.  Enjoy!


1 c. coconut oil (I used LouAna brand)

3/4 c. packed light brown sugar

1 c. granulated sugar

2 Ener-G eggs (or 2 real eggs- for 2 Ener-G eggs, mix 3 tsp. Ener-G powder with 4 T. water and let it sit for a few minutes)

1 T. vanilla extract (use the real stuff!)

2 c. brown rice flour

1 c. potato starch (not potato flour!)

1/2 c. tapioca starch

1/2 tsp xanthan gum (this is essential if you want your cookie to stay together)

1 tsp salt (a little less)

1 tsp baking soda

1 cup chocolate chips (I used Enjoy Life Dark Chocolate Chips.)

1 package Glutino Chocolate Sandwich Cookies (caution:  If you are cooking for someone with an egg allergy, you may want to choose a different brand of cookies.  These say they may contain eggs.  I have never had an issue but I also don’t get really sick.  Check with the person you are cooking for to make sure these cookies work for them.)


Directions: Make Ener-G eggs.  Mix together coconut oil and sugars.  Add Ener-G eggs and vanilla and stir well.

Stir together flours (brown rice, potato starch, tapioca starch), xanthan gum, salt, and baking soda.

Add flour mixture into wet mixture in thirds and stirring after each addition.  Stir in chocolate chips.

(If you stop at this point, you have a versatile cookie dough that you can put in ice cream or use as a crust.)

*Do not skip this step!*  Refrigerate dough for an hour.   Coconut oil melts at a lower temperature, so you will get cookie brittle if you put it in the oven without chilling it.

Preheat the oven to 350 degrees.  Once dough is chilled, put about a tablespoon of dough on one side of the Glutino and about a tablespoon on the other side.  Squish it together until you have completely sealed in the Glutino.  Put the prepared cookies back in the fridge while you are waiting for the oven to preheat.

Place cookies on cookie sheet and put in preheated oven for 13 minutes or until they start to brown.  They will harden some while cooling, so do not over bake.  Allow to cool a few minutes before removing from cookie sheet.

These freeze well.

If your cookies are spreading, you need to re-chill your dough before cooking anymore of them.  Or, you can just eat cookie dough :-).

IMG_4550.JPG
This is how they should look coming out of the oven if you have chilled the dough beforehand.

Adapted from the original recipe:

http://picky-palate.com/2011/01/06/oreo-stuffed-chocolate-chip-cookies/