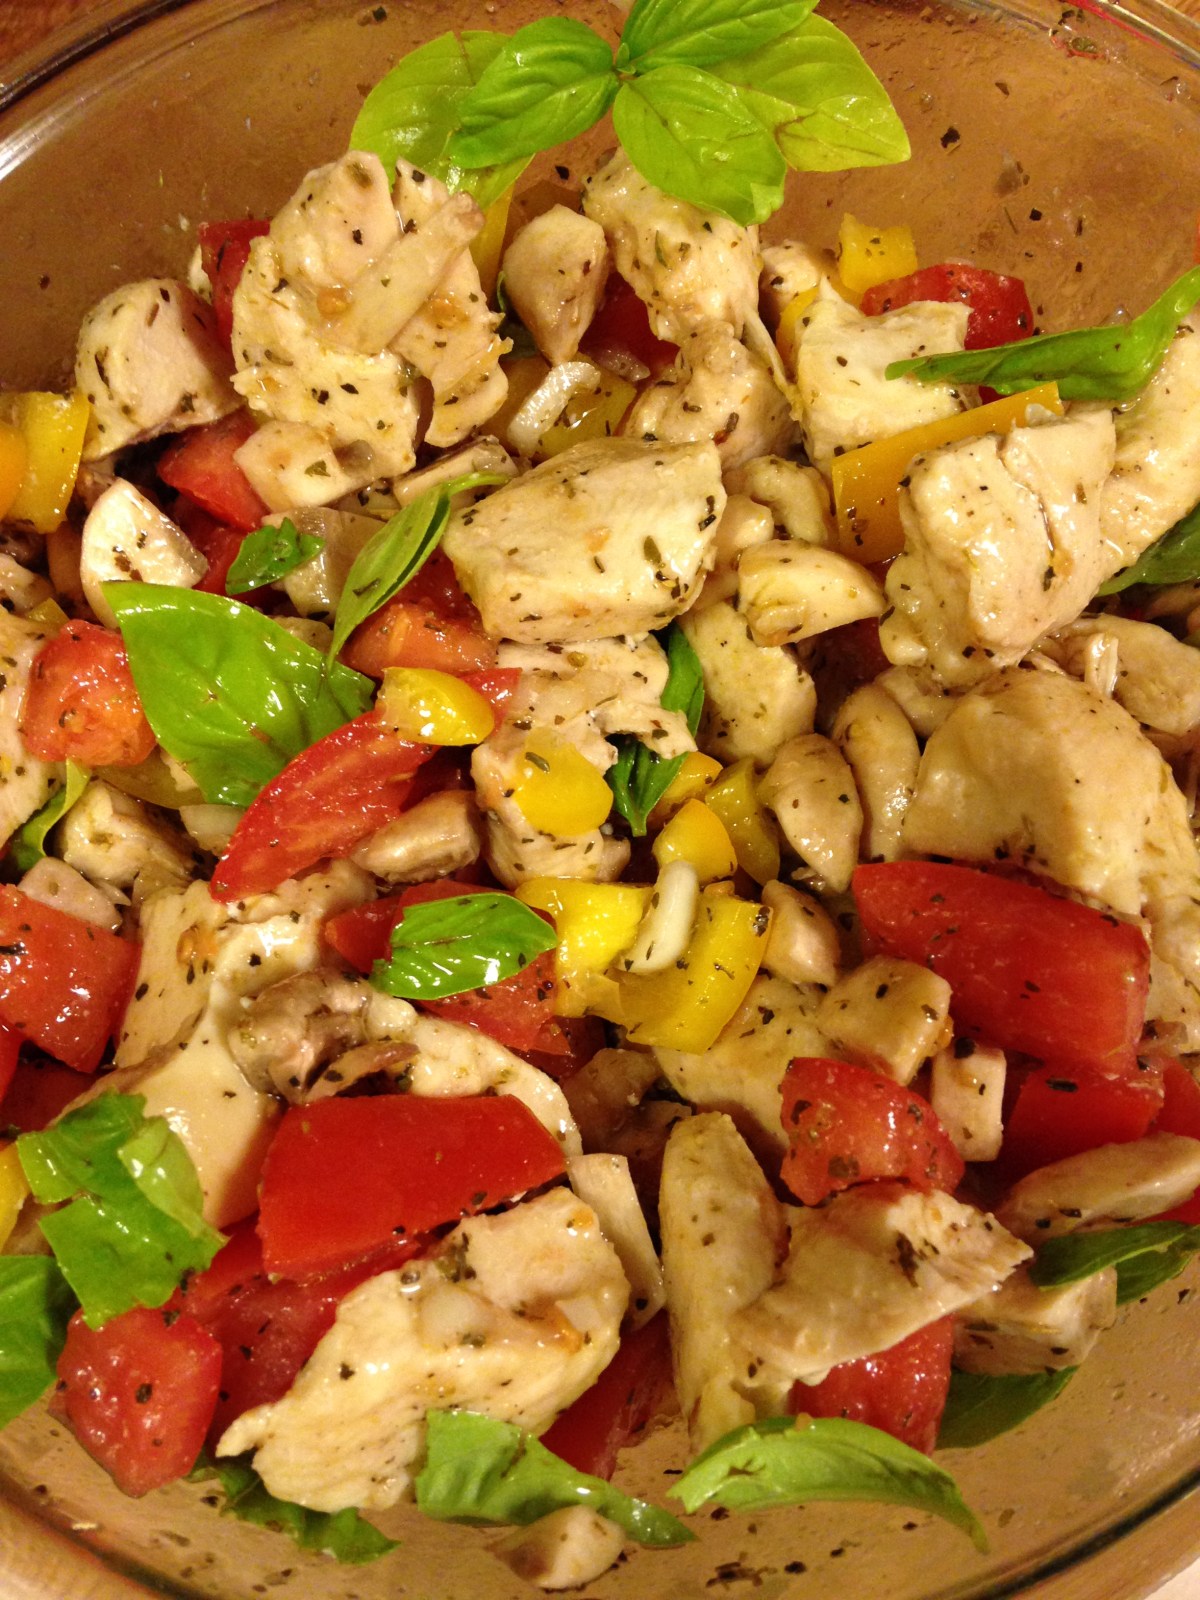
After I made skewers, I had leftover chicken and vegetables. I searched the internet and found inspiration for this recipe. It was, once again, a hit with the guys.
Ingredients:
1/2 c. olive oil (I used Extra Virgin Olive Oil)
1/2 c. red wine vinegar
1 tsp garlic powder
1 tsp dried basil
1 tsp dried oregano
3/4 tsp sugar
1/2 tsp salt
2 T. minced onions
1 yellow pepper, diced
3 roma tomatoes, diced
7-8 mushrooms, diced
2-3 cups of cubed, cooked chicken (lightly salted and peppered) (omit chicken for vegetarian option)
1-2 handfuls of fresh basil (optional)
Optional add-ins that I didn’t use:
Feta cheese
Black olives
Cooked pasta
Green onions
Directions:
Cook chicken and allow to cool. In a large bowl, stir together the olive oil, vinegar, garlic, basil, oregano, sugar, salt, and minced onions. Dice the vegetables and add to the olive oil mixture. Add cooled chicken. Stir in some torn basil leaves and garnish with a sprig of basil. Store in refrigerator for at least 2 hours before eating.
Spaghetti is such an easy dish. One way to make it special is to add meatballs instead of meat sauce. I thought I would never eat meatballs again since the ones in the store have flour in them usually, but I was inspired by the meatloaf recipe my friend showed me and a very bland version of meatballs found in a recipe book. This is the new and improved gluten free, dairy free, and egg free meatball that tastes normal. I like this recipe so much that I doubled it (okay, I also had a lot of ground beef sitting around because the big package was on sale). I have been experimenting with the spicing and this is what I did this time. It was my favorite so far, so you get to be privy to it!
Ingredients:
2 pounds ground beef
1/2 c. Rice Chex crumbs
1 1/2 tsp salt
1/2 tsp McCormick’s California Style onion powder with white and green onions and parsley (If you can’t find this, you can use 1/2 tsp onion powder and 1/2 tsp parsley. It’s cooking- the seasoning doesn’t have to be exact :-)).
1/4 tsp black pepper
1/4 tsp garlic powder
1 1/2 tsp Italian seasoning
Directions:
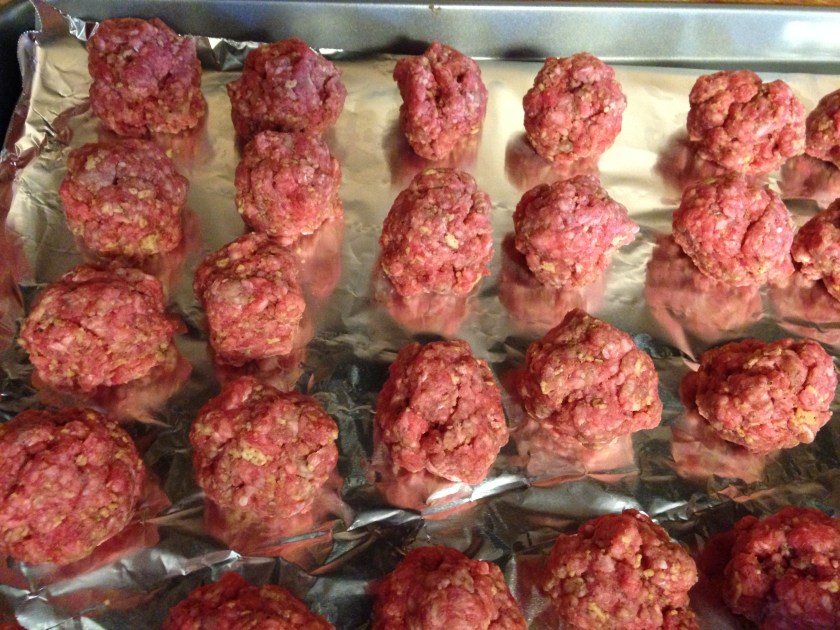
Preheat the oven to 400 degrees. Crush the Rice Chex until they are fine crumbs. Combine with all the spices. Put all the meat in a bowl and pour the spices and crumbs on top. Mix with your hands until completely combined.
Line a cookie sheet with aluminum foil and form into 1 1/2 inch meatballs and leave at least 1/2 an inch between each. Bake at 400 degrees for 20 minutes or until cooked through. Cut one in half to make sure.
I served mine over HEB gluten free noodles with a jar of Classico spaghetti sauce with about 4 T. red wine splashed in. I needed to use it up as it was still left over from my Harvest Stuffed Squash and it added a nice flavor to the sauce. Allow it to simmer until the alcohol cooks out- about 10 minutes or so.
This is how they looked before going in the oven.This is how they looked after being cooked.Mmmmmm…
“This needs to go on your blog.” This is what my husband said after he tasted this chicken. It is surprisingly simple and looks beautiful on a plate. One of my goals is to make things people want to eat, and I especially like it when I make something that tastes like it came from a restaurant. This definitely qualifies!
Ingredients:
4 pounds of chicken breast
2 Ener-G eggs (or 2 egg whites)
4 tsp cornstarch
Juice of 1 lemon (save lemon zest)
Oil for frying
Crumb Mixture:
1 c. Rice Chex crumbs or bread crumbs (make sure the bread crumbs are gluten free if you need to be gluten free)
2 T. dried parsley
1 1/2 tsp salt (I use sea salt)
3/4 tsp black pepper
1/4 tsp dried lemon peel (optional, but I used it this time)
zest from the lemon (~1/4 tsp- used in addition to the lemon peel)
3/4 c. finely chopped pecans
1/2 tsp dried oregano
1/2 tsp dried thyme
1/2 tsp paprika
dash of onion powder
dash of garlic powder
Directions:
Cut chicken into pieces the size of the palm of your hand (I cut some of the breasts in half so they wouldn’t be as thick.)
Combine egg, cornstarch, and lemon juice in a shallow dish.
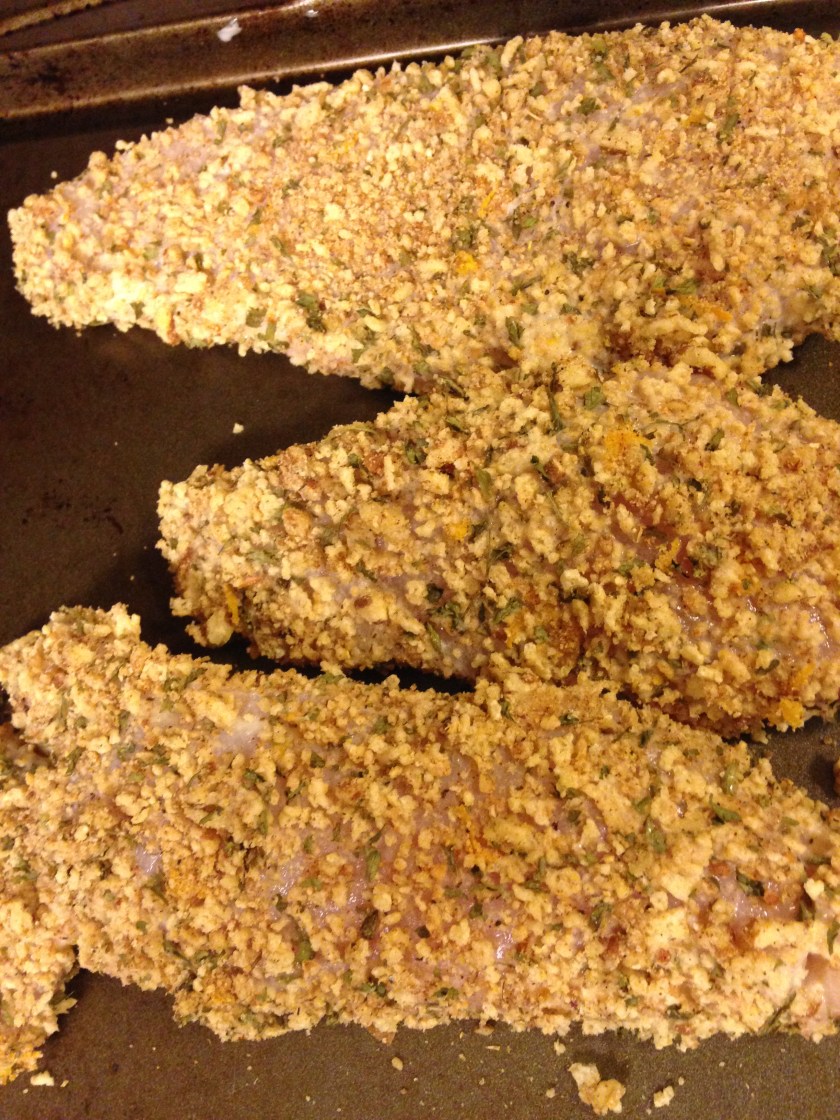
Crumb the Rice Chex in the food processor. Chop the pecans finely (I used the food processor too). Combine them with all the other ingredients in a shallow dish and stir well.
Dip chicken in the cornstarch mixture first and then dip it into the pecan mixture and press the pecan mixture onto the chicken to make sure it is coated well. Allow to air dry for 20-30 minutes, uncovered (I put it on a cookie sheet and stuck it in the fridge.) Don’t skip this step or your crumb crust will fall off!
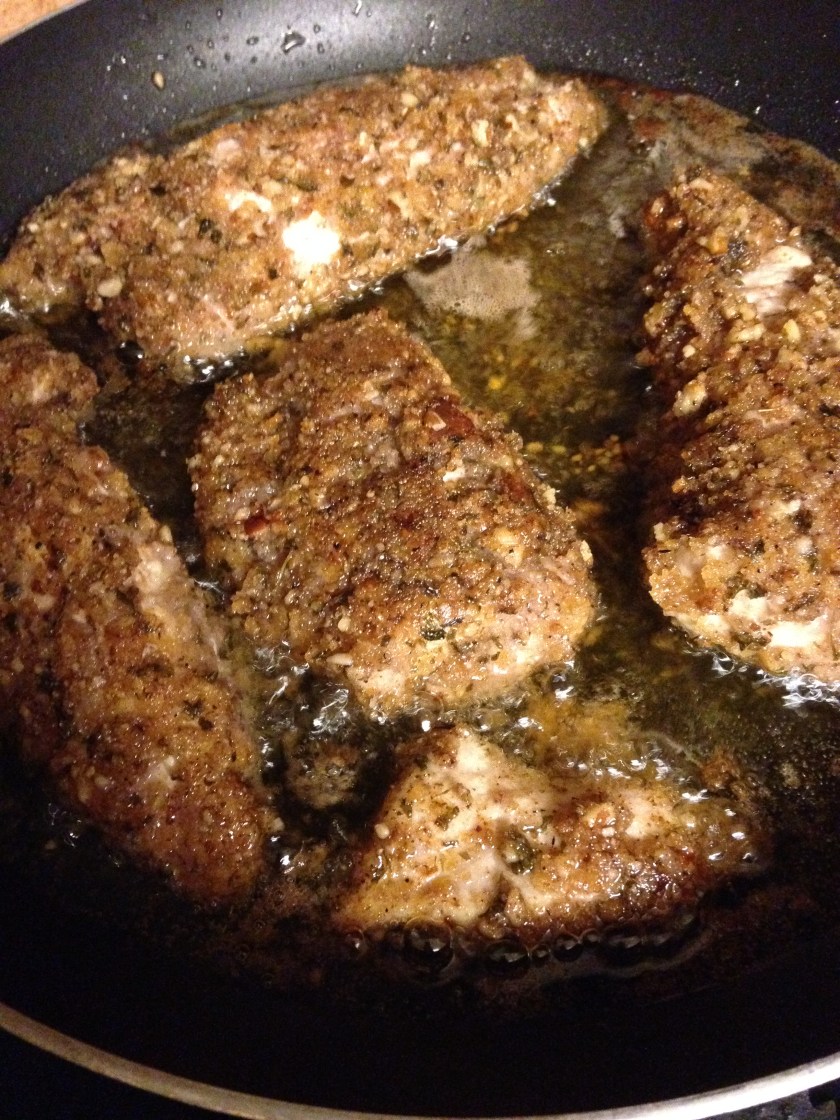
Fill a frying pan to about 1/4 to 1/2 inch deep with oil- I used canola. Heat oil until it pops when you splash 1-2 drops of water in it. Be careful and don’t splash yourself! I use a splatter shield over my pan. Once oil is hot, fill frying pan with air-dried, coated chicken. Fry on one side until the edges turn white and the top is starting to change color (maybe 5-7 minutes?) Flip carefully and cook on the other side another 5-7 minutes until chicken is firm when you press on it with a spatula or until it is done when cut through a thick part. Remove chicken to a plate and allow to rest for 5 minutes before cutting in and enjoying.
To store, I let the chicken cool on plates with the most recently cooked side up. Store in air-tight containers and microwave to reheat.
This is what the crumb mixture looks like.First, dip the chicken in the cornstarch mixture.Then dip it in the pecan crumb mixture and press it on so it sticks well.This is what it looks like after it has been turned once in the frying pan.One piece of pecan encrusted chicken coming right up!
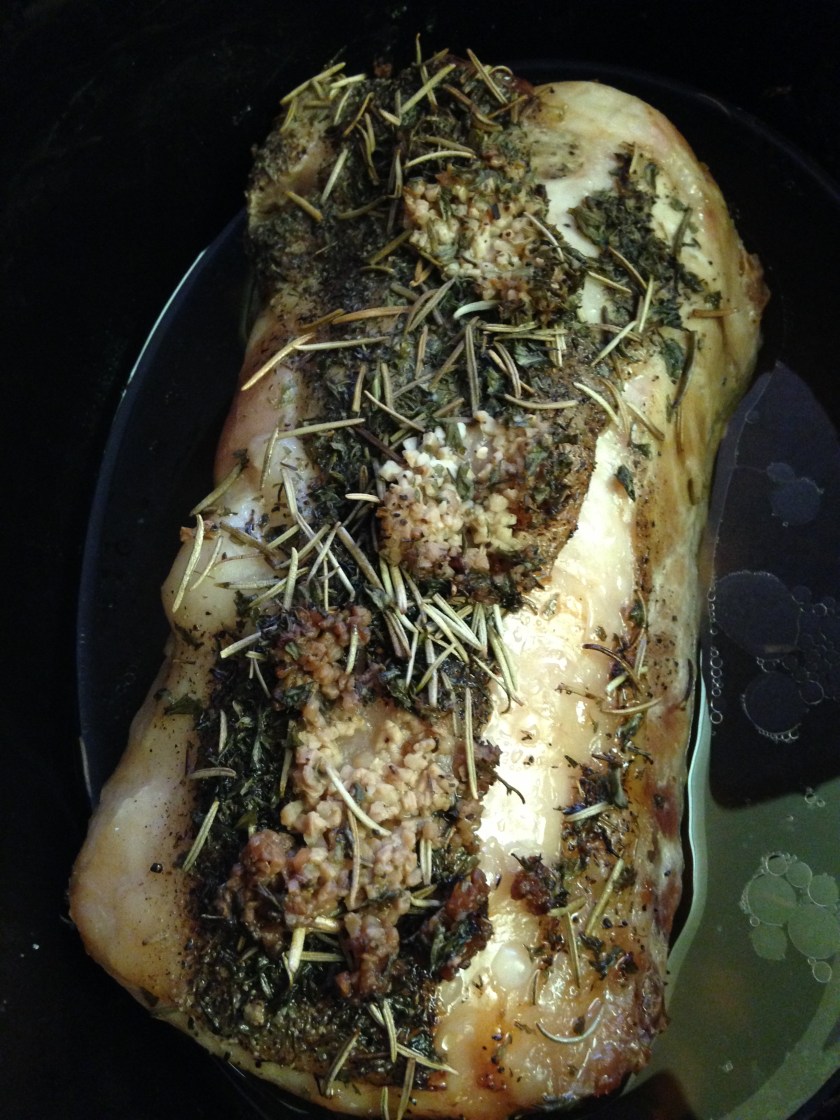
I still get a little nervous when I am feeding more than 2-3 people. I haven’t had much practice with it and I am always afraid there won’t be enough food. One way to get over this is to practice having dinner guests. The real reason we have dinner guests is that we want to get to know them, but the side benefit is I am starting to get a feel for how much food is needed. This was an eight pound pork roast. It turned out to be way too much food for us and our dinner guests, but fortunately we live in the modern era and have a freezer. Some of it has come back out of the freezer already and has been used for carnitas.
This recipe was originally intended for a small pork loin. I made it for a pot luck once and it was a hit! This time I decided to try it with this humongous roast. At $1 a pound, how could I refuse? The large roast had a mild flavor because the spices had difficulty getting to the middle of the roast, but if you have a small roast or pork loin, it will permeate just fine. You could probably stand to double the spices if you are using a large roast. We ate the parts that had been sitting in the juice without adding any sauces or anything. The middle parts we have been using for other things like BBQ pulled pork and carnitas. The great thing about cooking is that it is extremely flexible, so you can use this recipe as you wish.
Ingredients:
2-3 pound pork loin or pork roast (can use up to an 8 pound roast)
3 T. lemon juice
3 garlic cloves, minced
1 tsp crushed rosemary (didn’t use the time I took it to a potluck, but I did use it this time)
1 tsp parsley flakes
1/2 tsp thyme
1/4 tsp pepper
1/4 tsp salt
Directions:
Put the loin/roast in a crock pot. Spread all ingredients on top of the roast and turn to coat (this was impossible with an 8 lb roast, but was easy with a smaller porkloin.)
For a smaller piece of meat, cook on high for 4-6 hours or low for 6-8 hours. For a larger piece of meat, cook on high for 6-8 hours or low for 8-10 hours. I cooked mine on high for 8 hours because it was so large.
Original recipe: http://www.food.com/recipe/simply-delicious-crock-pot-pork-loin-317045
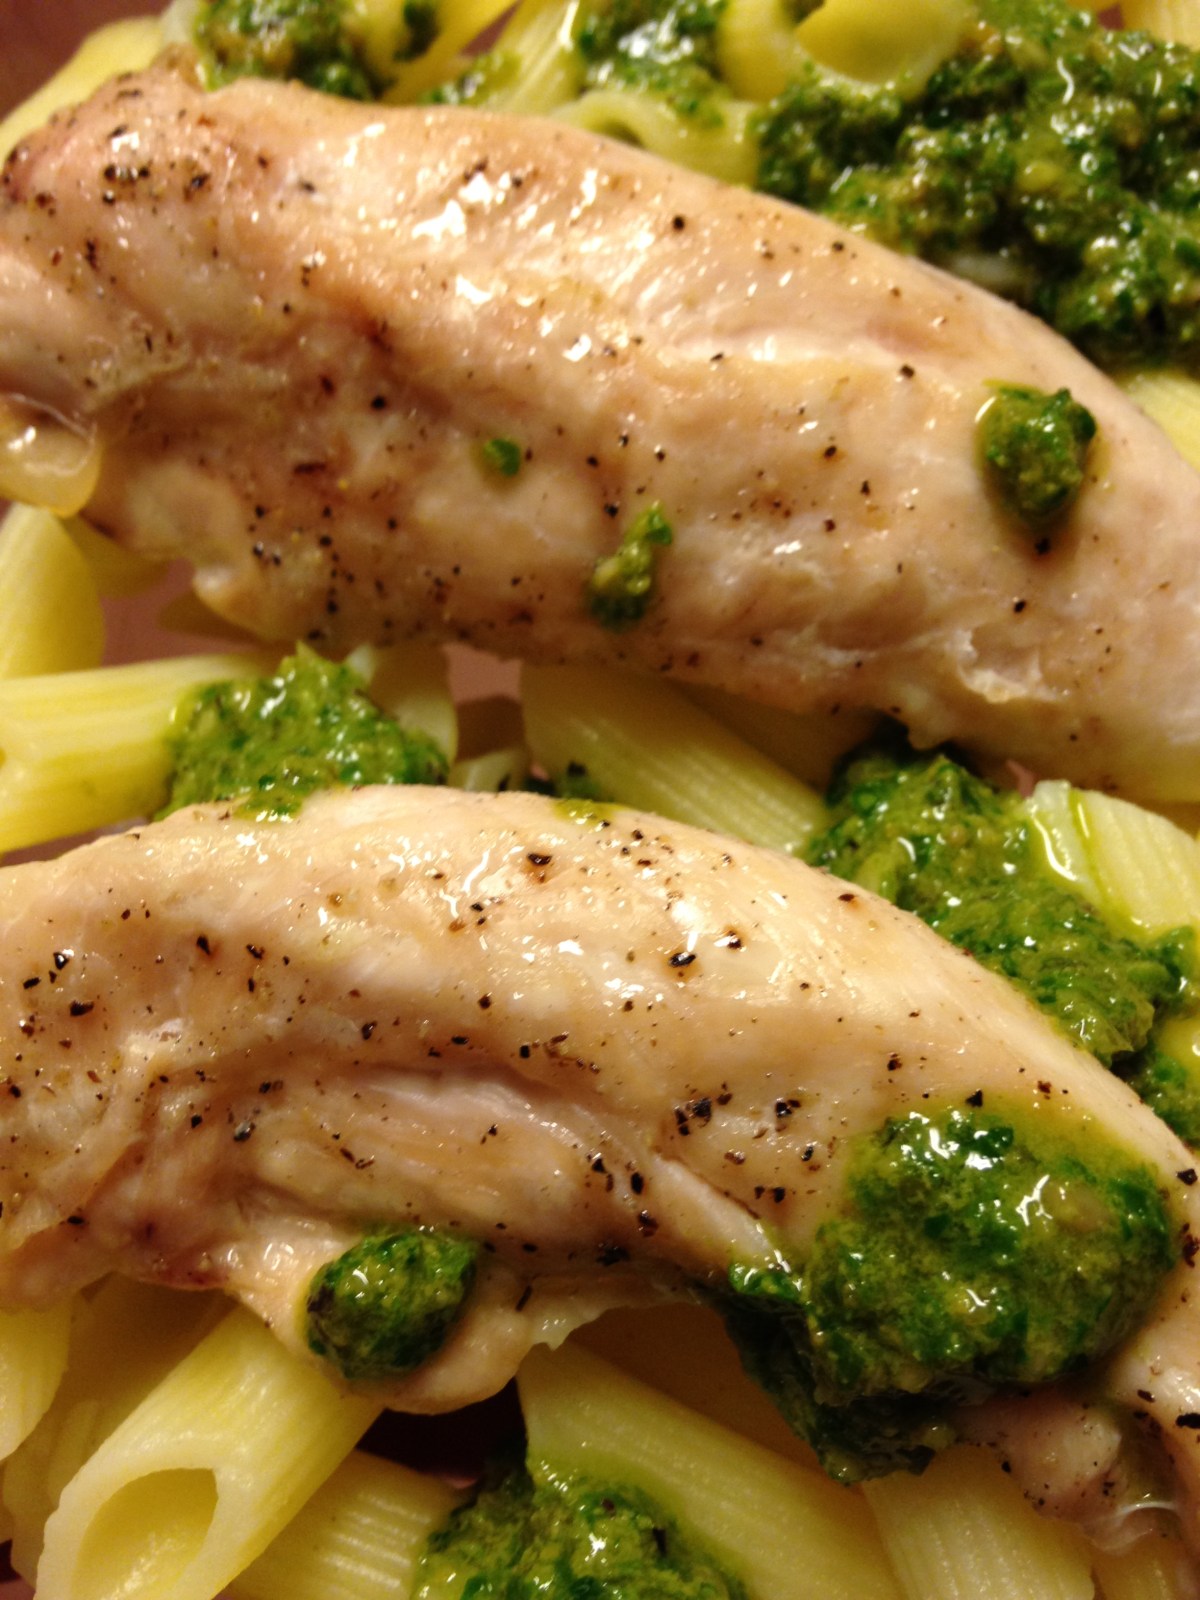
I found this pesto recipe a few years ago and have made it over and over again with different variations. When served without chicken, this is a vegetarian and vegan dish.
1/3 c. pine nuts, pumpkin seeds, or sunflower seeds (preferably raw and unseasoned)
2/3 olive oil (this is a great chance to use up extra virgin olive oil if you need to)
5 cloves garlic
1/3 c. nutritional yeast- found in bulk in many stores or in the nutrition department
1 bunch fresh basil leaves
salt and pepper to taste
optional add in: 1-2 handfuls of raw spinach
Directions:
If your pine nuts, pumpkin seeds, or sunflower seeds are raw, toast them over medium heat, stirring constantly, until they start to brown. Don’t over cook them.
Add all pesto ingredients to a food processor and blend until smooth. Notice if your seed/nuts are already salted and salt accordingly.
Serve over your favorite gluten free noodles and top with baked chicken.
I over-salted my pesto, so I added in some spinach leaves. It actually gave it a nice color and fixed my salt problem. It made it so much prettier that I may add some next time just for flair.
Before adding spinach
First I tried adding the spinach as a salad. It tasted good, but I wanted a more polished look.
I did not make enough of this the other day. I could have eaten it for a few more meals! This is a simple curry recipe that doesn’t require many strange ingredients.
Ingredients:
1 1/2 T. canola oil
2 T. curry powder
1/2 onion, diced
2 cloves garlic, minced
2 pounds chicken breast or tenderloins cut into cubes (I used leftovers from my chicken recipe and shredded it. Recipe found here: https://oldfavoritesmadeglutenfree.com/2015/12/19/baked-chicken/)
1 can coconut milk (14 oz)
1 can diced tomatoes, NOT drained (~15 oz)
1 can tomato sauce (8 oz)
3 T. sugar
1 tsp salt, to taste
1 tsp pepper
1 bag of frozen stir fry vegetables (I used HEB snap pea stir fry mix)
Cooked rice (I used Basmati)
Directions:
Heat oil and curry powder over medium-high heat in a frying pan for 2 minutes. Add onions and garlic and cook for another minute. Add chicken and stir. Reduce heat to medium and cook for another 7-10 minutes until chicken is cooked. Stir in coconut milk, diced tomatoes with their juice, tomato sauce, sugar, salt, and pepper. Cover and simmer for 15 minutes. Add frozen vegetables and continue to simmer for another 15 minutes. Stir occasionally. Serve over white rice.
This is what it looked like in the pan before veggies.
After I added veggies it looked a lot more colorful!
Strew the onions and garlic in the bottom of the crock pot. Add chicken broth. Stir together the sugar and spices and then rub on the entire pork loin. Place pork loin in the crock pot and put on high for 6-8 hours or low for 8-10 hours.
We used the pork loin for a variety of dishes: carnitas, pulled pork sandwiches, etc. It freezes and defrosts really well. In order to freeze it, I shredded it ahead of time.
Here is a pulled pork sandwich I made using Hamburger Buns and by adding Sweet Baby Ray’s BBQ Sauce.
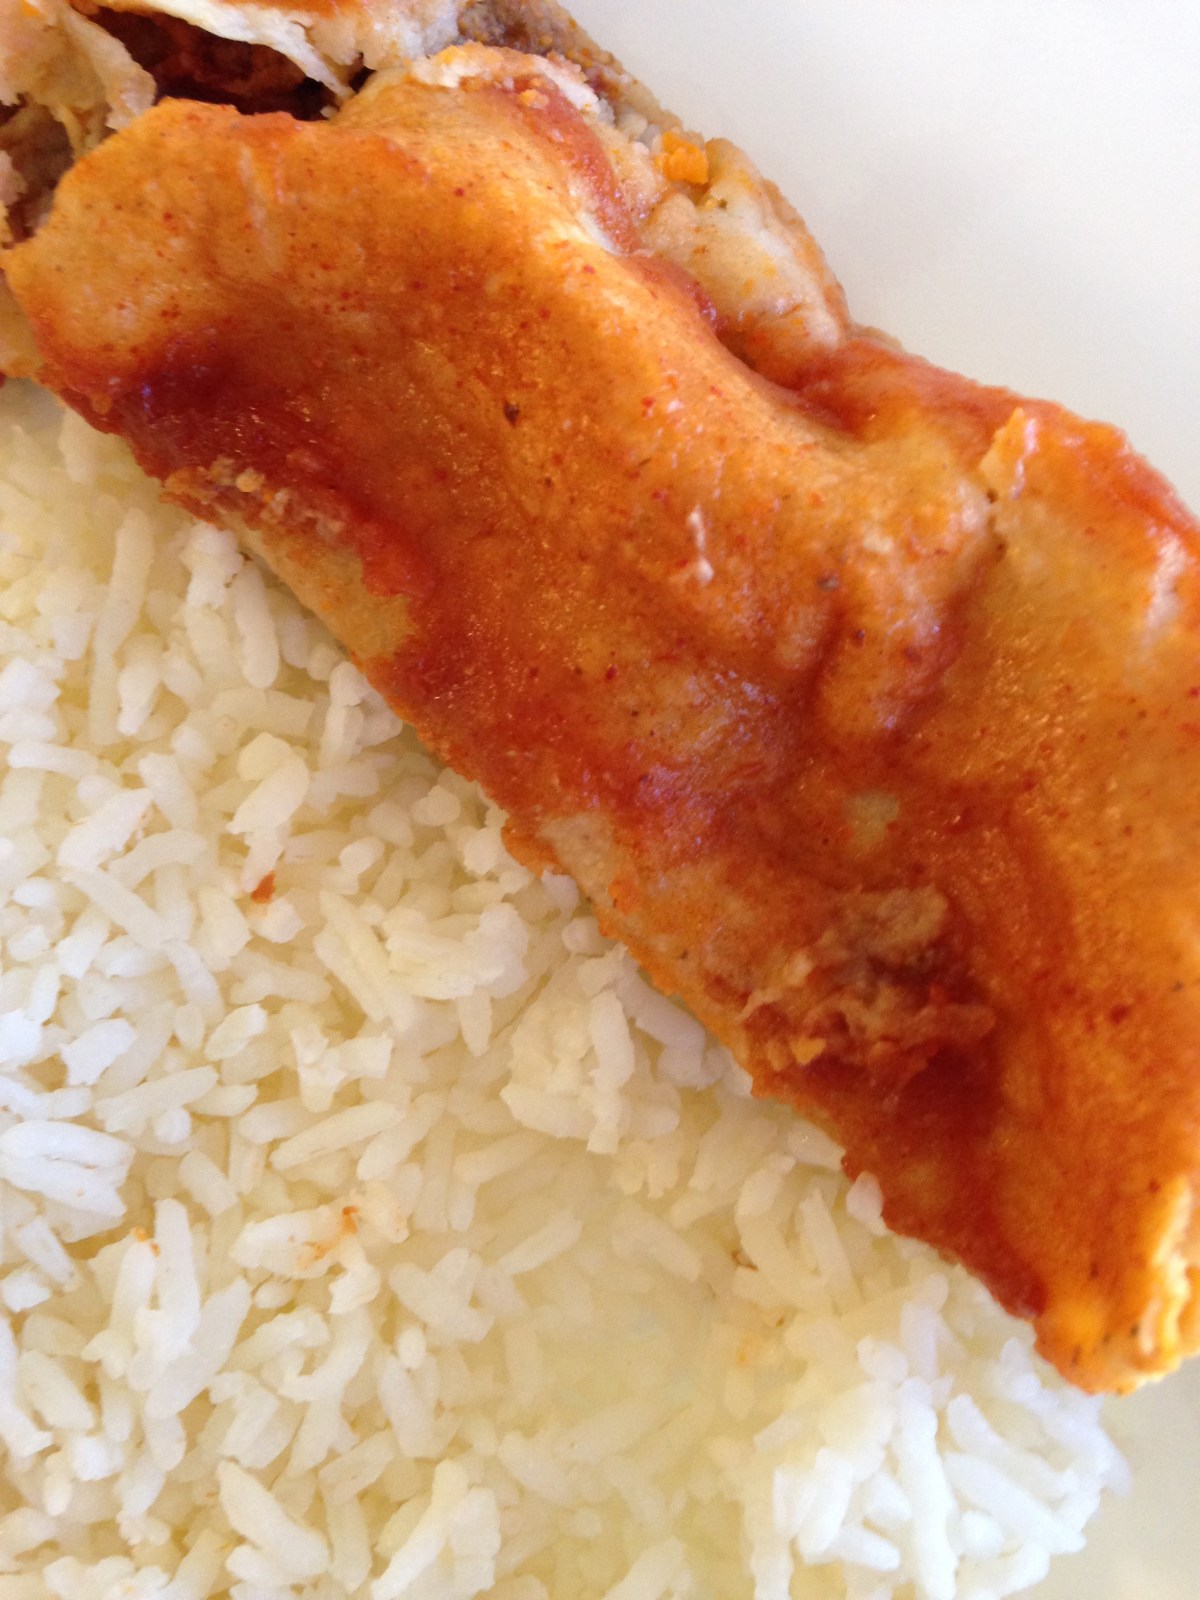
This is the last lonely enchilada. I made several pans of them and remembered to take a picture right before I ate the last one! I served these enchiladas to my family on Christmas Eve. I did most of the prep ahead of time and just rolled them while the oven was heating up. The beans make them creamy so you don’t really notice the absence of cheese. However, if people want cheese but not everyone can have it, I suggest putting some shredded cheese on the table that they can add at their leisure.
Ingredients:
1 pound ground beef (omit if vegetarian)
1-2 cups cooked and mashed pinto or white beans or 1-2 cans of refried beans
several dashes of salt if you make your own beans
juice of 1 lime
1 can rotel
2 cans of mild Old El Paso Enchilada Sauce (last time I checked it was gluten free. Please always take personal responsibility and check the ingredients. Sometimes manufacturers change things without much of an announcement.)
1 package of corn tortillas
Directions for beans: If you are making your own beans, soak them overnight, drain in the morning, and put them in a crockpot all day on low. They are finished when they are easily squishable. I drained the liquid into a bowl and then added just enough in to be able to mash them with my immersion blender. Make sure to add some salt if you made your own beans. If that sounds too complicated, just get a can or two of refried beans. 🙂
Directions: Brown the ground beef until thoroughly cooked. Add in the lime, rotel, and one can of enchilada sauce.
Lightly oil a 9×13 baking dish. Open the second can of enchilada sauce and put a very thin layer on the bottom of the pan, but reserve most of it. Grab a tortilla and put a spoonful of the beef and bean mixtures into the tortilla. Roll it and place it in the pan. Continue until the pan is full and/or all ingredients are used. Top with remaining enchilada sauce.
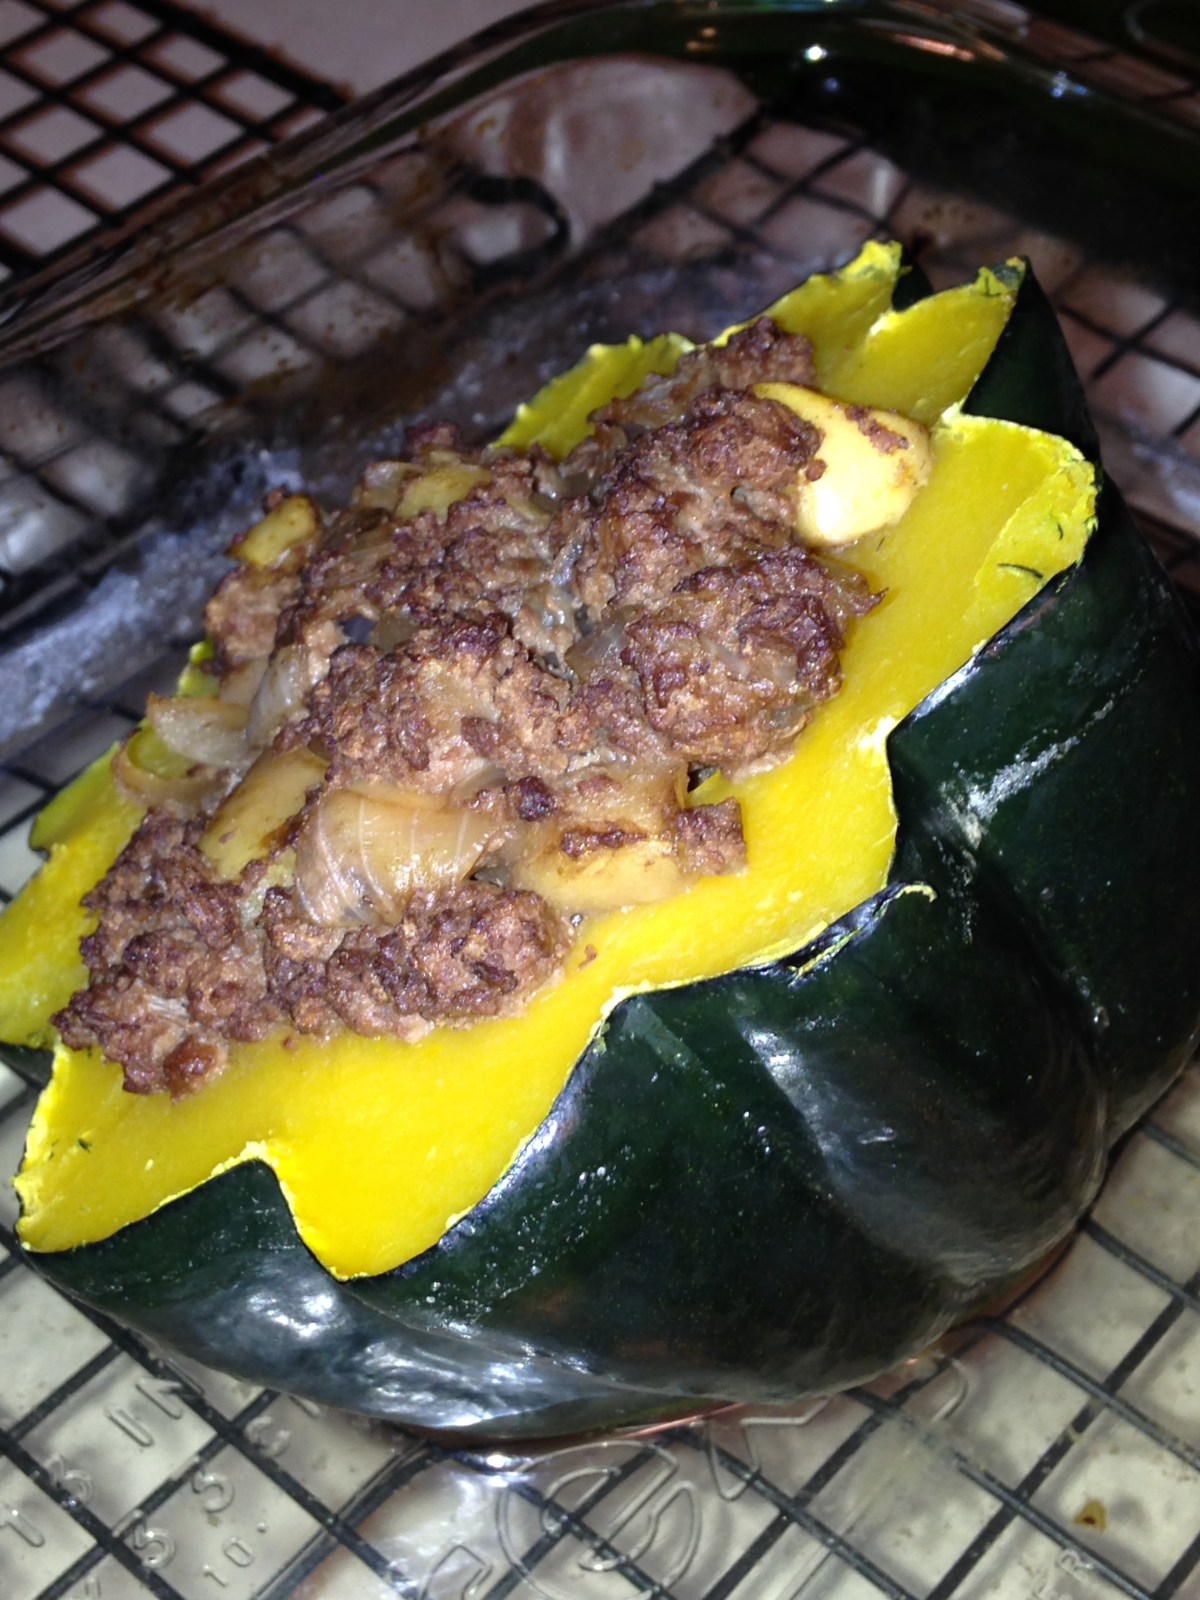
This is one of my favorite fall recipes. It looks beautiful and appears to be labor intensive, but it isn’t. When it’s all said and done, it takes about an hour from beginning of prep to the time it arrives on the table. The original recipe is from a newspaper clipping. I have made a few changes, but it is still delicious!
Ingredients:
2 medium acorn squash
1 pound ground beef or deer
1 medium onion, chopped
1 tart apple, chopped (I use Granny Smith)
1 glove garlic, minced
2 T. brown rice flour
3 T. gluten free soy sauce (I use Kikkoman’s- just make sure it says gluten free on it)
salt to taste
3 T. dry red wine (I used merlot)
optional if not dairy free: 1/2 c. shredded cheese (cheddar, mozzarella, or Parmesan)
Directions:
Cut squash in half from stem to tip and throw away seeds. Fill baking dish to 1/2 inch depth with hot water (I just microwave the water). Place squash, cut side down, in a baking dish. Bake uncovered for 30 minutes at 400 degrees.
While the squash is cooking, brown the ground beef with the chopped onion, apple, and garlic until meat is cooked. Sprinkle in flour and stir well. Add soy sauce and wine and stir. Bring mixture to a boil and stir until it thickens. Remove from heat.
Remove squash pan from oven and carefully turn each half over (leave the water in the pan) and fill each half with the meat concoction. I press it down into the squash halves to try to make it all fit :-). Cook the filled squash in the pan with the water still in the pan for another 15 minutes until meat begins to brown on top slightly. If you are not dairy free, you may top with cheese and return to the oven for another 5 minutes.
To serve, remove the squash from the pan and place on a plate. To eat, scoop out one bite at a time, no knife needed. I usually serve this by itself- it has veggies and meat included and is way more filling than you’d think.
Original recipe from “Harvest Stuffed Squash” The Eagle [Bryan], 13 September 2009. Taste of Home Cooking School p. 22.
Sometimes you just want an easy meal, right? I often cook chicken this way and use some that night or the next day and then freeze a bunch of it to be used at a later time. It can be served just the way it is with a size of frozen vegetables and it’s a tasty meal, or it can be put in mango chicken, spaghetti, or whatever! I usually just eyeball it as far as proportions go, but here’s an estimate of the amount I use. A rookie mistake it to heavily coat the chicken in oil which gives you a pan of sizzling oil and chicken broth, so coat it lightly!
4 pounds chicken tenderloins or chicken breasts
1/4 c. olive oil
1 T. salt
1 tsp pepper
Mix olive oil, salt, and pepper in a small bowl. Coat a cookie sheet with aluminum foil (so cleanup is easier). Place raw chicken on the cookie sheet with a little bit of space between each piece of chicken. I usually have to use two cookie sheets. Using a basting brush, lightly coat the chicken with the oil mixture. If you have extra oil, you can turn the chicken over and coat it, but that’s not necessary. The most important thing is to make sure you get some salt and pepper on each piece of chicken.
Cook chicken in an oven preheated to 375 degrees for about 20-25 minutes. Chicken is done when you cut it and it shreds like chicken (think Chick-fil-a sandwich), or when you press on the top and it feels firm to the touch. Make sure you let the rest of the chicken rest for 5 minutes before cutting so it can soak all those good juices back in and remain moist!
After the chicken cools, you can freeze it. I usually put it in the fridge overnight and then freeze it the next day. It seems to help it freeze better to gradually change the temperature.